Jul 11, 2011, 7:30 am · #51
Very nice, period correct parts usually look better
Browse › Builds & Media ›Build projects
Very nice, period correct parts usually look better
I just use those wheels/slicks for autox...they are stupid wide....Although, I have been tempted to try them on the streets...but i am afraid i would get thrown in jail if a cop pulled me over with them on.
They look dumb as FUUUU just keep them for conez
i wasnt going to run them on the streets for looks....hah.
meshies have arrived!!!!!!!!!!


so im now settled into my new home. set up most of the garage so far. still need to do the floor and maybe paint the walls. both of which should have been done before i filled it with my shit. also need to weld up my wheel rack and bolt it to the wall.
moved the s12 from essendon to avondale heights 2day, was an interesting ride. the guy at the servo made me pre-pay because it looks like such a banger with no plates lol plus all the looks i was getting was hilarious. rocking no exhaust, it was soooo loud i really thought i was gonna get stung by the popo, temp reg or not they weren't gonna like it haha. so now to start working on this beast again. im first goin to strip, clean and repair the interior then stat back on the body work again as its taken quite a beating being stuck in my old drive way. i've noticed my dad had put some nice dents in the front drivers side panel the bastard! anyway he it is in its new home.


stay tuned for more updates, things are going to get alot more serious now :)
keep up the good work.
cant wait for more updates
sam31183 on 09:55:30 PM / 11-Jul-11i wasnt going to run them on the streets for looks....hah.
while I am a fan of the old Centerline style wheels, those do NOT look like " and -0. I have 7" -0 on my car, with 300ZX hubs which push things out a bit more than S12 hubs: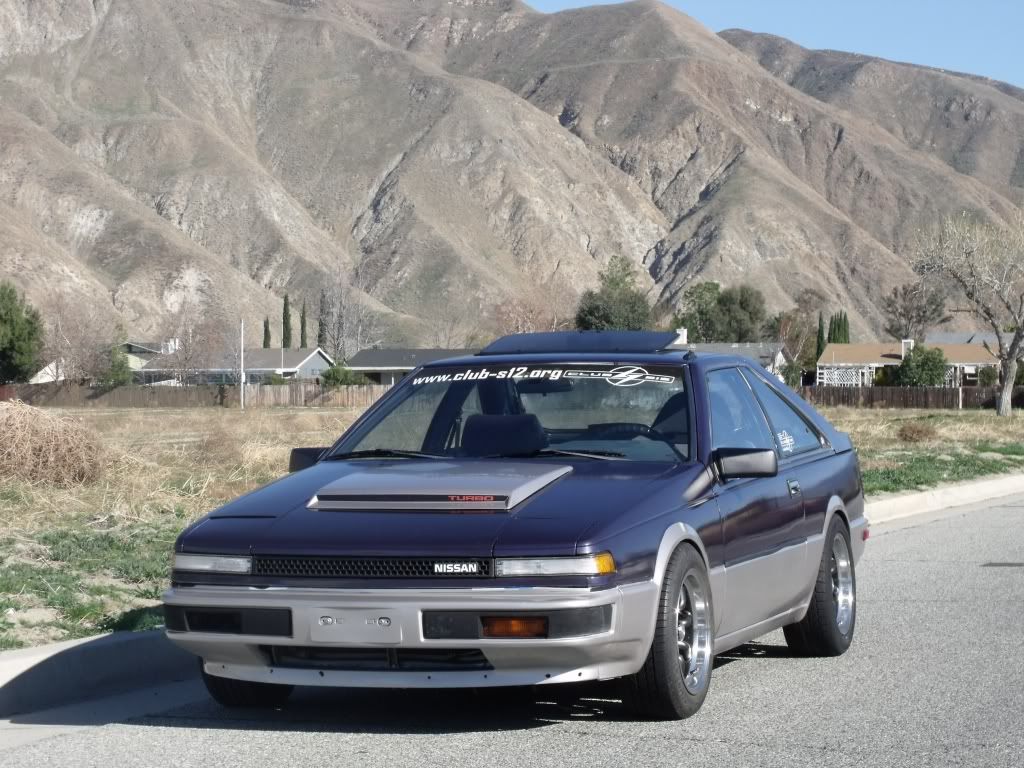
Yours stick out more than that:
And you say those are 205's? On a 7"? I have 205's on my rears, that's on a 7", and they aren't stretched like that.. Given that your wheels poke more than mine in the front, and given that there is some mild stretch on them with 205's, is it possible you are mistaken, and these are 8" -0 wheels you have?
Alright man are they the straight bolt on BC Racing coilovers for the S12 as im looking for a set myself??
so this weekend i began the task of reconditioning all my wheels. both my hoshino's and my southern ways are in pretty bad shape including a few bent areas some fairly nasty gutter rash and pitting.
so the first task was to trim some of the gutter rash back and clean the contaminants off the rims. next was the alloy filling. now i done have a tig and i was looking for other ways of repairing them. to get them done professionally i was looking at at least $150+ per wheel and at min $1200 for the 2 sets it was far too expensive. so i came across a product online by a company called laser. its called 4707 aluminium repair system. costs about $50 for the kit and all you need is a butain torch as the melting temperature of the brazing rods is 500deg c lover than aluminium. i started with my normal butain torch and that worked but it was rediculously slow to get the wheels up to temp so i lashed out and bought a map gas burner. about $130 from bunnings. its butain mixed with acetylene so it burns soooo much hotter! and this thing worked AWESOME! got the wheels up to temp in no time and laying down the braze was easy as just run a tinning layer on then just build up the material till the rash or missing chunk is filled. let cool then file, shape, machine, sand and polish.
enough with the bs stories i'll let the pictures do the talking
some of the damage

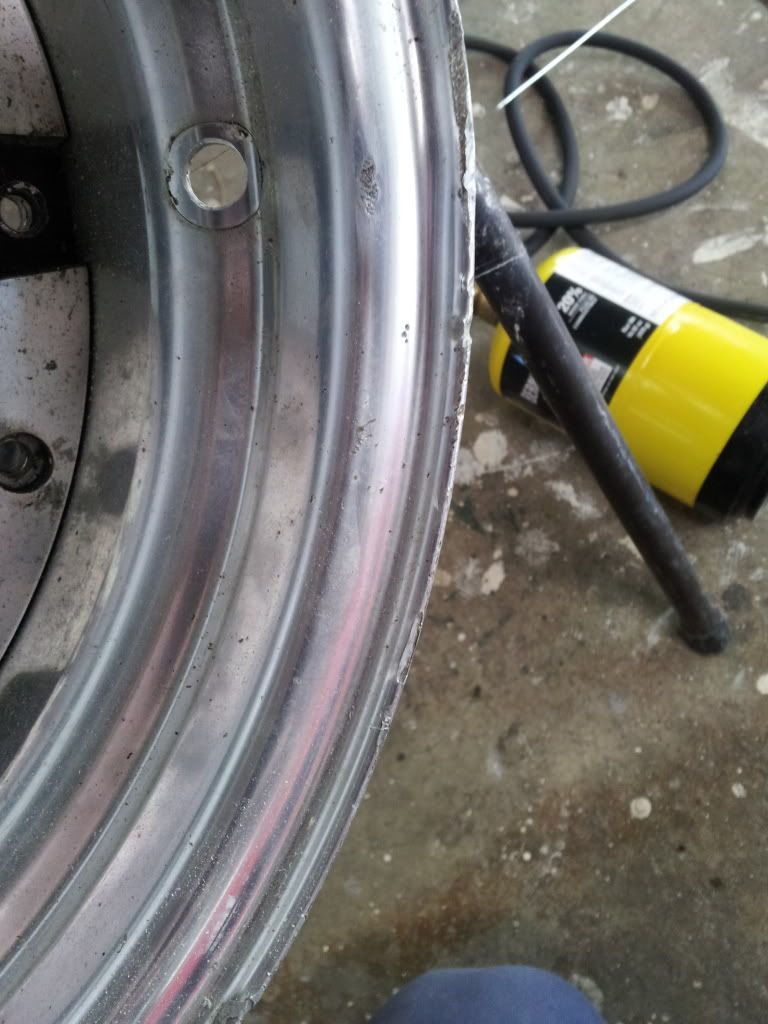

the 4707 aluminium repair system
the map gas torch. the onei got came with a 1.5 meter hose so it so much easier to use than holding the whole bottle all the time.
the braze/repair

i managed to repair 2 full sets of wheels in about 1.5 hours and didn't even finish a whole rod. i filled about 12-13 gashes. this stuff is so versitile for diy use i'll post the instructional vid to show how awesome it is.
then i knocked up this little bad boy to take off some of the excess alloy before using the same technique to file and sand each wheel. they still need alot of work but im getting there. i've improved it further by bolting it to the floor rather than the jack :)
win in square
so the work continues. lately i've been doing more work on khaled's rs-x then my car but im still getting through the body work.
here's what i've been up to
i have been on the search for an air compressor for sanding and spraying purposes for about 6 or so months now and finally picked up a 3hp 100ltr 20cfm beast. down side was it was 3phase and the pump was fairly shot. with the sale came a single phase 3hp motor so i converted it to single phase with a new pulley and motor then dismantled and rebuilt the pump and repaired the pressure switch.

so with that i could finally run my 5" air sander sander
sanded the mkII bumper down and began paint prep.

about a week later i went to a closing down sale of an engineering factory and picked up a heap of awesome stuff for really cheap. bout another compressor for $100 its a single phase 3hp 15cfm twin pump 50ltr. th bloke said it wan't working very well and didn't turn off due to a faulty pressure switch.
got it home cleaned it up adjusted the pressure switch and replaced a gasket in the pump and it was running like a dream! $500 saving on that one :)
the same day i also scored a drill press clamp, 4 dawn 'G' clamps and a 9" bosch grinder all up a spent $190 inc. the compressor :D i was wrapped!
so enough about the tools back to the car.
bonnet stripped back to bare metal because there was a nasty clear coat underneath that was giving me grief. the more i sanded the more it would just chip of and give me jagged edges.
sand
strip
clean

rust sealer/converter
mkII front apron only had a mkI on the car when i bought it
also picked up some spare guards off steve yesturday, top bloke. they're pretty shabby but it'll be good to have the spares.
and these just arrived from japan as i am typing this
nissan s12 silvia key blank
and these awesome period correct new old stock fog lights with covers made by amex japan :)


just waiting for the sealer/converted to dry and i'll go get some paint mixed up then i get to turn the garage into a paint booth :)
Damn looking good. Been looking for a key like that for a while now, Congrats!
nice work.
I would also love to have a Key like that one :/
long over due update and a large one at that. i've been hella busy these past few months with holidays, Christmas, new years etc. also went to japan for 4 weeks which was really awesome! got to check out Tokyo auto salon which was only by sheer luck that it was on at the time I was in Tokyo. bought a whole heap of stuff inc. 2 1:24 scale s12's :)
so since i've been back i really wanted to get stuck into the s12 to get it finished so i can at least drive it.
so what am I up to?
i've reconditioned the door trims, these were rooted. so many cracks missing bits and creaks etc. so i've spent many hours on the hot gluing and screwing them back together. the've turned out perfect i just need to colour match some vinyl for the tops and im done.


rebuilt the window switches
next was the radio facia. it had been completely fu**ed by none other than gary's car audio. i wouldn't have paid $5 for this job
this was his quality cd player install. hot glue, universal metal strips peices off a ford and black felt to fix his fu** ups. i wasn't even going to attempt to bring this back to life because i had a spare but it was way off in colour and just looked out of place and i really want the original look.

so i spent ages picking away at the mounds and mounds of hot glue. i managed to pick every last bit out of the inside.
next was the felt on top. this was put here to cover the wood screws he'd used to secure the steel. and not just one hole bu 2 because he'd first screwed into the metal clip behind then screw another hole next to it. so the felt was stuck down with what? yeap u guessed it hot glue. dont get me wrong its great suff but like everything theres a time and a place haha. so i gently heated and picked away at it and managed to get it all off with out damaging the facia. i looked brand new once i'd finished, bar the 2 holes in the top. the holes i'll cover with an old pioneer badge off some old retro speakers.


next was sanding back and repairing the front and rear bumpers.
the front was easy just sanded it back with my orbital sander and prepped it for paint.
the rear on the other hand i knew was going to be trouble. i could tell from the out side that there was a previous repair. so i began to hack away at the filler to reveil a decent scar. it even looks like a scar because it was repaired with stapels then bogged over. but the stapels had rusted, split the bog and the paint. there was also another tear through the bottom of the bumper.
i did a lot of research in order to repair this gash. i looked into getting a platic welder i looked into weird and expensive adheasives but none could definately assure me a perfect repair. so i though i'd have a go and repairing it with a method that just came to me. the repair needed to be strong and very flexable being a soft polyurethene bumper.so instead of using fibre glass or something similar i deceided to go buy some polyurethane sealant/adheasive similar to silicone in a cauking tube. now on its own this stuff is fairly strong once cured but it would still tear open so i added some fibre tape to the mix. I cleaned and prepped the area and held the crack together with HD stappels on the put side. then i layed down a thin layer of the poly on then added a layer of the tape smothering and pressing it into the the poly like u would with fibreglass. i covered the patch completely with 3 layers of both the tape and the poly. same method used on the lower crack except i drilled a hole and the end of the crack to stop it going any further!
so this was all just a gamble really and it paid off big time! so after it had cured for 2 days i removed the stappels (because they would eventually rust ;) ) and its strong as! i even tried to tear it and it held so im wrapped with the result. the poly was only $10 for the tube and the fibre tape it really old plasters tape i had lying around.


http://i220.photobuc...zps5c2ba785.jpg
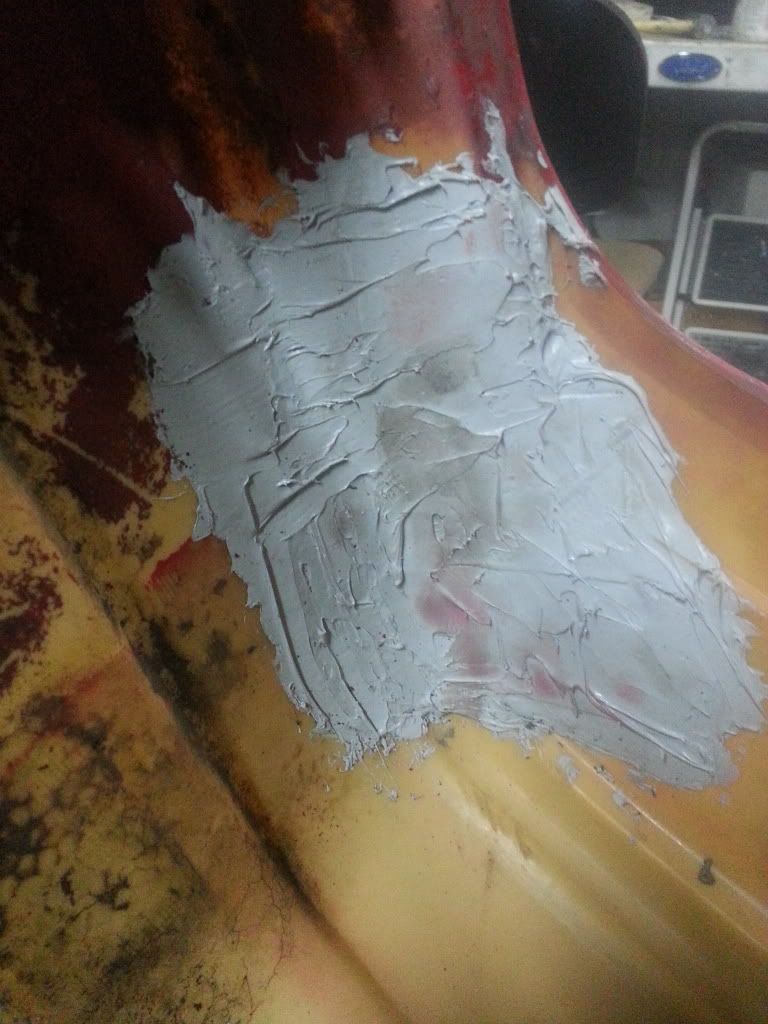
now all that left is to fill the outside and prep for paint.
the next on the list was the exhaust. i've been meaning to do this for ages! but i left me argon gas on a few months ago and it all ran out so i haven't been able to weld for quite a while. i went and got another bottle the other day (fu** you boc and you registration and over priced fees and refills :thumbsdown_anim:) so this was only going to be a temp exhaust, nice an quite for RWC so it didn't need to be special. i made the whole thing from scraps of old exhaust pipe that i had either lying around or i grabbed out of the scrap bin at the local exhaust shop :) took me about 3 days on and off to complete but it turned out awesome and sounds really good. the muffler is an old ford one that was brand new but has been sitting around for about 5 years or so. glad i kept it.
started from the cat
as u can see it really is scrap haha
all painted and finished. i only painted it because the multicoloured rust and sh** looked terrible and this bad boy is supposed to pass a rwc :whistle:
Isn't it great when your ingenuity pays off and you don't have to pay out the ass for parts!? Well done.
been going pretty flat out on this thing lately. after putting the finishing touches on the exhaust and fitting it up I took it for a spin around the block. I only just made it back when the clutch pedal fell to the floor and there was no clutch! damn. so this started a huge rebuild of a lot of parts.

the finished product
first point of call was the slave cylinder. pulled that off to check it. it was seized and full of shit. so i cleaned and rebuilt it with all new seals.
next was the clutch master. i noticed a big stain on my carpet in my passenger footwell at first i just thought it was just over use of the car and general wear and tear. but after a bit of poking around i found that the seals in both the clutch master and the brake master and booster had failed while not being used for such a long time and were leaking into the carpet. and on to the front right chassis rail. so all of that came out for rebuild.
leaking!

clutch master rebuild


brake master rebuild
while poking around under the car cleaning and painting all the damaged paint from the brake fluid I noticed the sump and the front main seal was also leaking! so this began another mammoth job. to change the sump gasket on a ca20e you need to either drop the K frame or lift the engine. i went for the later. but it still very difficult! with the motor hoisted as high as it could go there was only just enough clearance to get the sump off, however there's the little problem of the oil pick-up. so with the sump dropped and resting on the K frame and with about 2 inches of room i undid the 3 bolts for the pick up dropped it into the pan and out they both came. while that was out. i changes the oil pump gasket, front main seal, timing belt, water pump gasket (this had been previously done with household silicone) haha also flushed the whole cooling system, braised a few cracks and mounts on the radiator, gave everything a good clean, paint etc. and reassembled it all.

I came to the conclusion that this motor has had a fairly hard life with the oil stuck in the bottom of the sump was all congealed so signs of the oil getting far too hot.
took me a while to clean it all out
all cleaned painted and reassembled. look so much better and i shouldn't have to do it again to this motor.
The key you got and u send me the web page of where it is??
sure
yahoo.co.jp :D
thought i'd update the thread as its been a while. haven't been putting any solid hours in on the s12 lately because I've been renovating my laundry.
anyway i've managed to track down quite a few parts that i have been after for a while and a few brand new ones.
i bought a pair of rear hand brake cables brand new old stock to replace the old ones in there. i already replaced these once before with second hand items and they have suffered the same fate. once the plastic coating cracks the coil surrounding the cable rusts and seizes the cable.


next was door hinge bushes. these have been annoying me for a while. the door was sagging so much that the interior trim would catch on the sill and just about tear if off so this had to be addressed. my mate khaled need the same job done on his jdm s12 so did my 180sx and his s15 so we made a group buy of brand new brass bushes from nissan. bit of a tricky job but i've done it quite a few times so its pretty easy once you know whats up.


opens and closes like a brand new door now *sounds just like a golf*
and here's a few other recent acquisitions
finally got my hands on a mkII bonnet!!!!!!!!!! thanks to dean, top bloke to deal with. so i have every part required to bring it back to its original state. i had to get it couriered all the way from NSW. dean packed it up in a massive bonnet box and taped and covered all the corners in thick cardboard and the courier still managed to fu** it. bothe back corners were sticking out of the box when it arrived and were both folded over :( i was going to do the whole insurance thing but i had no time in the end. so i just repaired them and got on with life :) the bonnet had another old repair on it around the wiper nozzle hole. there was about 3mm of bog which scared the fu** out of me because i was thinking under all the primer there was going to be a sh** tonne of dents full of bog! so i flipped it over removed the heat lining and to my surprise the bonnet was in mint condition apart from the small amount of bog around the hole. so i stripped back the paint heated the bog and scrapped it out. the dent was accessible from the other side and was very east to push out using a comma dolly. no bog required! :D


also bought these 2 parkers brand new old stock, i now have all 3 pairs offered by nissan for the mkII
and finally for this update i managed to track down an original working radio and tape deck for the old girl. there was a bloke on gumtree selling a gazelle so i asked if he would part with the radio and he declined a few of my offers up to about $100. then i tryed once more explaining i was restoring mkII gazelle back to oem and that most s12 owners throw them out as soon as they get the car and install cd players. re replyed saying "in that case, its yours. im more than happy to help out someone who has a passion for cars." how awesome is that? sold it to me for $20 plus post! top bloke.
how i got it. filthy!
cleaned and installed, stoked!
stay tuned, plenty more to come in the comming months.
I still have that same stereo stored in the attic. I believe the fm had stopped working, AM was ok, and one channel on the tape player didn't work in one direction, but ok the other way. Always liked the way it looked.
wow. lots of great parts and fj hotness. damn aus has all the good stuff
we actually dont have any good parts, our gazelle's are bone stock base models :( all the good parts are in the US and europe
yeah that's not an FJ I see in the bay, looks more like a single cam CA.
Looks like you've put in a great deal of work! Very respectful job you're doing. Keep at it!
yea the FJ is still on the engine stand getting freshened up. once thats done it'll go in.
what an awesome looking radio :wideeyed:
Nice rebuild also! :yay!:
What do you use for stripping your paint from bumpers and hoods ect
metal parts i just used industrial paint stripper in gel form. on the plastic parts i just sanded them down. but you can use brake fluid to strip paint from plastic parts without damaging them. just need to let it soak and be patient.
