Browse › Builds & Media ›Build projects

Re: Nissan s12 MkII - rockin it ol' school - Fj20 yO!

Started by DaGa · May 2, 2011 · 80postsSMF 2010–26

DaGaMay 2, 2011, 4:17 am · #1

the other motor is incomplete fyneyoungstunna , so when i check it all out and find out whats missing i'll let u know...

good evening bitches, got a f*ck tonne of work done 2day, was a massive pain in the arse doing it all on my lonesome but what can ya do...

started but priming my tank with kill rust primer

[img width=640%

methylpropMay 2, 2011, 4:50 am · #2

Looking good man.

Oki JoshMay 2, 2011, 5:22 am · #3

schweeeet

DaGaMay 2, 2011, 5:53 am · #4

btw wheels specs are.

IMPUL hoshino D-01's in 14 x 7.5 -1 and 14 x 8 -7

newby200sxMay 2, 2011, 9:43 am · #5

badass man keep it up!

kelso840May 2, 2011, 12:15 pm · #6

Dude you're pretty hardcore. Welcome!

Drft-s12May 2, 2011, 12:17 pm · #7

Dayum loving the clean ass 180sx......Your S12 project is looking awesome cant wait to see more :nerdystraight:

s12_PilotMay 3, 2011, 2:07 am · #8

damn thats a beautiful 180sx, and nice project, really inspires me to continue with my two project cars. GOOD LUCK MAN LOOKS AWESOME

-Jon

DaGaMay 3, 2011, 4:05 am · #9

thanks people more updates coming soon :)

newby200sxMay 3, 2011, 7:12 am · #10

Dude if you can take a r eal good pictore of the decal on the left rear  light that says gazelle that would be great, i asked HEITH if he had those stickers but he doesnt because he doesnt know which font to use so please post some pics man

DaGaMay 5, 2011, 6:38 am · #11

so 2night i got my sway bar in with all new bushes, steering rack and a pair of neotech adj. castor rods. next thing to do is to install the sr20det brakes and start on the rear.

@newby200sx. i took some pics of the gazelle decal for you. i hope they came out ok i had to use my phone and it was a little dark i'll upload soon for you.


Post Merge: 06:49:36 AM / 05-May-11
posted image
love shot :)
posted image

posted image

posted image

posted image

posted image

posted image

posted image

posted image

posted image

posted image

hope the pics are ok dude. if u want some better quality ones i'll have to go charge up the digi cam
methylpropMay 5, 2011, 10:13 am · #12

dude you are hardcore. Nice to see some 1 like that join the s12 community.

DaGaMay 6, 2011, 3:56 am · #13

lol i wouldn't say hardcore but what can i say, i love my nissans :)

so i finished work earlie 2day and decided to put in some solid work until the sun went down. managed to get the front end suspension finished got the brakes on bled the power steering got the stock wheels on and dropped it back on the ground.

then i went to start it to move it but it wouldn't start. so after some troubleshooting i worked out the fuel pump was seized, damn :( so whipped out the pump to find a pretty nasty sight. tank full of shit, pump full of shit and the cradle starting to corrode, more damn :(

then i lost light and couldn't do anymore, even more damn :(

so i have to order a new pump and clean and modify the cradle for it.

pump out
posted image

eww
posted image
posted image

disassembled
posted image
posted image

contents of filter lol
posted image

car back on its feet :)
posted image
posted image
posted image
posted image

methylpropMay 6, 2011, 4:11 am · #14

looks good man. give me a idea of what mine will look like when i lower it. i am using s14 hubs and lca's.

DaGaMay 6, 2011, 4:43 am · #15

u'll have a wider track on the front mate as s14 arms are longer than s13. pretty good fitment for stock wheels.

methylpropMay 6, 2011, 4:49 am · #16

ya i have a little more poke. I'm running 15's so i should be able to have a decent stance. I need spacers in the rear.

DaGaMay 6, 2011, 6:09 am · #17

im goin to run 14's after i pass road worthy, and yea im gonna need a spacer on the rear aswell. running a 14x8 -7 on the rear with extended studs and 15mm hubcentric spacer

ProlowtoneMay 8, 2011, 4:25 am · #18

Damn. You have been busy

DaGaMay 10, 2011, 5:30 am · #19

got plenty more done tonight. ordered a new walbro fuel pump, bought some new rear lower control arm bushes. the tank is pretty filthy and rusty so i dropped that. thank f*ck s12's have a drain plug! there was about 45 litres in there haha.

bot it out and gave the outside a really good clean, took off all the sound deadening and dirt and shit and filth ready for a nice new coat of paint. thinking of painting it either white or red or even just laying a new coat of sound deadener. i'll figure that out when i clean the inside out.

anyway heres some pics it really does look like its just rolled off the assembly line in japan. came up imaculate :)

posted image

posted image
i can see right through it! haha

posted image
will come mint as with a good scrub

posted image
posted image
posted image
posted image
just bought it from nissan oem :)

BattleFairyMay 10, 2011, 2:12 pm · #20

wow bling bling
if I would be fuel, i would be happy to go inside LOL

DaGaMay 17, 2011, 7:53 am · #21

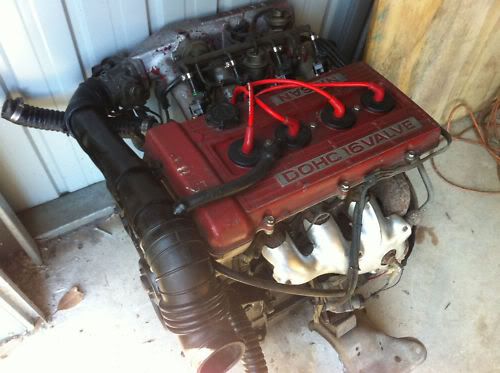
so i have a pretty epic update :) to exited to even wait till i pick it up haha. i just won an engine on ebay, well 2 engines to be exact and a gearbox and a loom and an ecu and for fuck all :D

so im just gonna leave this here
posted image

its a fj20e i was originally looking for a fj20et but this came up and i really like the idea of building a strong and reliable 2ltr NA. part of the reason i enjoyed my original s12 so much. and on the other had if i want a turbo fj i'll just build it out of the spare motor :)

ProlowtoneMay 17, 2011, 9:04 am · #22

Epic :) thats fucking sweet, and you got 2? for next to fuck all? I wish that was the case up here, lucky to so much as get pics of them here

DaGaMay 17, 2011, 9:57 am · #23

yeap, got 2 motors, a gearbox, looms, mounts, crossmember and an ecu and im sure they'll be more stuff when i goto get them. got the lot for $700aud. i cant wait to pick them up :D


Post Merge: 03:25:28 AM / 18-May-11

im currently working on the rear end, i have removed pretty much everything except the diff and xmember, and am trying to get the rear control arm bushes out and get all the parts cleaned up and ready for reassembly.
picked up a new pair of D bushes and link bushes today and some paint for the fuel tank, i've fone with a nice bright red to match the exterior (not that its going to be seen :D)
posted image
finished modifying the fuel pump cradle for a walbro 255lph still needs a good cleanup to finish it off. plus i cleaned the inside of the tank and treated it with rust converter which probably wont last long but ah well.
posted image
posted image
and here's a quick flick of the other motor i got in the sale, comes complete but i was told a couple of conrod bolts let go and consequently caused some damage. it also comes with both stlyes of intake plenum's offered by nissan a larger one for the dr20 skyline and a small version for the s12 silvia so pretty happy about that too.
posted image
DaGaMay 22, 2011, 8:13 am · #24

so finally saturday came and after going to an recievership auction i set off with a mate to Kawarren, 20mins out of colac. took us about 2 hours and 20mins to get there in the trusy kia k2700. finally got there and the dudes shed was fucking epic! 8 car garage with a 2 poster hoist and a 4 car carport on the side. his colection of cars included a heavily modded 32gtr, ae86, r31 skyline, 2x 1200 utes, 2x Suzuki LJ50V baby 4wd's, new hilux setup for some serious 4wding and an epicly powerful buggie that keeps tearing apart hub splines haha. so anyway backed the truck in and loaded up both engines, gearbox and a box full of loom and spares. also scored a set of new rear brake pads :) so all loaded up we set off back to civilization haha. got back when it was dark so i didn't unload the motors untill today after the hangover wore off.
so at the auction i mentioned i bought a 3phase 500kg chain hoist for $80 and a work bench, the hoist really came in handy getting the motors off the truck got it all unloaded and ready to go on an engine stand. had to pull the clutch and flywheel off to get it the stand and i couldn't be fucked so i'll leave it untill 2moro. only got one pic of the whole adventure out the back window just after we left to get home. but 2moro arvo i'll be sure to take a few more of the haul haha

posted image

DraconisMay 22, 2011, 11:57 am · #25

Hell yeah... Nice win.  Love the picture of the FJ in the bed.

DaGaMay 23, 2011, 6:15 am · #26

tonight i went back up to my dads factory to mount the engine on a stand for inspection. got the electric crane rockin again :) i brought some large metric bolt from home left over from the 180sx but none of them fitted the tranny mount hols on the block of the fj so off to mitre ten to pick some up. couldn't find any on the shelf so i had to go searching through a huge box full of mixed up bolts and screws that were reduced haha managed to find 4 that'll do the job. $5 down i headed back to mount it all up. took the presure plate, clutch plate, flywheel and backing plate off and mounted the motor on the stand yay. thought i'll pull rocker cover for a quick inspection. all looks good except for the loose timing chain but thats a common problem in fj20's. this ones quite bad though as its been grinding on the bottom of the rocker cover. all those shavings had to have gone somewhere. i hoping their chilling in the sump or stuck in the pick up. all the cam lobes look mint as and the head seems pretty clean for 20year+ old motor. so over the next few weeks im going to fit it with a modified mazda chain tentioner and give it a really good inspection top to bottom and a good clean and paint, replace hoses, gaskets etc. and then once the car is reg'd i'll whack it in a go silly :)

now for picture dump

posted image
s12 intake manifold

posted image
poofterish fj20 afm

posted image
box of snakes alive ;)

posted image
my new engine stand

posted image
ripper chain hoist i been using

posted image
posted image
posted image
posted image
posted image
posted image
posted image
fj20 Yo!

posted image
posted image
gouges made by timing chain :S

posted image
posted image
gives good head!

posted image
posted image
slack on chain, its only that bad due to hydralic tensioner so i'll fix that sh** when i get to it

peace

SlickS12May 23, 2011, 2:48 pm · #27

cool man, looks like its starting to get off the ground.  good luck on the rebuild/refresh on this puppy.  ru planning on going turbo or just sticking with n/a?

Drft-s12May 24, 2011, 1:15 am · #28

Awesome Fj's are beast its nice to see another member keeping a Fj alive....

DaGaMay 24, 2011, 7:31 am · #29
SlickS12 on 02:48:43 PM / 23-May-11cool man, looks like its starting to get off the ground.  good luck on the rebuild/refresh on this puppy.  ru planning on going turbo or just sticking with n/a?

gonna keep it NA, run turbo cams and quad throttle bodies to really make it sing! haha gonna source some motorbike quads and mod them to fit :)
fyneyoungstunnaMay 24, 2011, 12:10 pm · #30

you decide to come off that spare fj block when your done, let me know.....

good progress so far and nice cars!!!

DaGaMay 25, 2011, 2:19 am · #31

u want me to send an 160kg motor to the USA? ur keen!

fyneyoungstunnaMay 25, 2011, 9:45 pm · #32

seriously, it couldnt be that bad?

DaGaMay 25, 2011, 10:05 pm · #33

I recon it'd be atleast 1k +

DaGaMay 30, 2011, 3:54 am · #34

got all the bushes pushed into the rear control arms today and cleaded them up, they look like new now. also got one of the rear inner guards stripped and painted before it got topo dark to work :(

posted image

posted image

posted image

posted image

VG33ERGazelle?May 30, 2011, 11:02 am · #35

oh yay for fj.

DaGaMay 31, 2011, 8:24 am · #36

u know it!

still doing the painful job of stripping the deadener from the underside of the car ready for a fresh coat. should have it all done by this weekend i hope

DaGaJun 3, 2011, 12:27 pm · #37

both rear inner guards stripped and painted
removed what was the most rusted exhaust i have ever removed from a car!
weight reduction of about 2 1/2kgs of dirt jammed in behind rear mudguards/pods
rear sway bar removed for cleaning and re-bushing
starting to strip old deadening and grease and dirt from rear rails and underside for re painting
cleaned diff housing and rear subfrome

time to drink beer

fyneyoungstunnaJun 6, 2011, 12:37 am · #38

I expected it to be about that give or take.
My offer still stands......

DaGaJun 6, 2011, 2:46 am · #39

the other motor is incomplete fyneyoungstunna , so when i check it all out and find out whats missing i'll let u know...

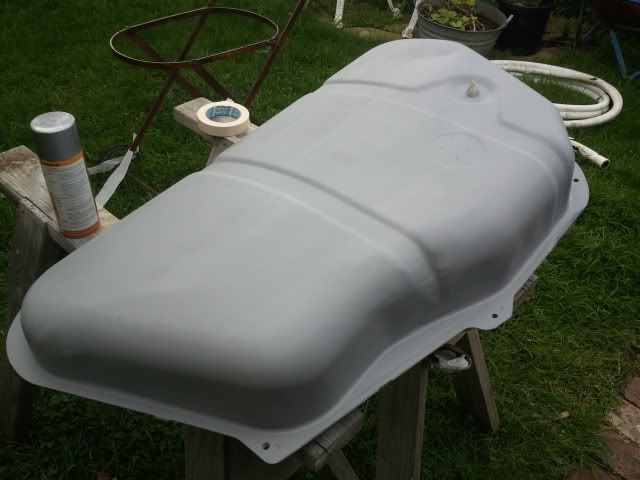
good evening bitches, got a f*ck tonne of work done 2day, was a massive pain in the arse doing it all on my lonesome but what can ya do...

started but priming my tank with kill rust primer

posted image

posted image

posted image

posted image

posted image

next up was to get all this shit 
                   V

posted image

posted image

posted image

posted image

and stick it in there
           V

posted image

posted image

it was a massive pain headache to squeeze the new control arm bushed between the cross member tabs on my own but i eventually got them in. they weight about 15kg's each and u gotta hold all that weight then slip the driveshafts in the slot the other 2 mounting points in then try to align the holes while still supporting the weight! AHHH! but its done so whatevs :)

posted image

posted image

posted image

posted image

next to go in was the sway bar, swaybar mounts and links. gave them all a good clean and greased all the bushes before assembly

posted image

posted image

posted image

then it was time to stick these kents in aswell
                     V
posted image

and u get something like this

posted image

posted image

posted image

posted image

posted image

posted image

having a separate spring and shock combo will mean having to do a shit load of adjustments to make it all sit correct but she'll be right better than these dirty old bastards
posted image

and while all this shit was going on i did this
                             V

posted image

posted image
its only the top of the tank so not worries about orange peel, only managed to spray the top as it was pretty cold and the paint wouldn't dry quick enough :( so i haz an ideaz :idea:

posted image

sif not use your heater inside your house to dry freshly painted petrol tanks
"problem mum?"

pretty happy with what i got done today so now im having a beer

enjoy

decoJun 6, 2011, 2:08 pm · #40

dude i was looking back for the first pics of your build, and it looks like you killed your first post man...

anyway its looking good. wish i had the cash to start doing any of that. soon enough though.

zastabaJun 6, 2011, 3:17 pm · #41

Lookin great man. Good to do some of the less fun maintenance stuffz now then when they get out of control later.
DaGaJun 7, 2011, 12:33 am · #42

yea really trying to get to a respectable standard before i get it on the road, all the bushes in my old gazelle were flogged out and it drove like a pig it was quite dangerous

DaGaJun 13, 2011, 3:17 am · #43

so i made a fair bit of progress today, and a slight setback as well.

i managed to mount my freshly painted fuel tank up into position, re-install my rear brakes with new pads, tighten and torque the rear end and hook up and install the fuel pump and cradle. once i did all that i when to start the car and she fired up straight away! naice! untill i notices fuel spewing out from the rear end FUCK! this is where a checklist would have come in handy because i forgot to reconnect the return fuel line to the tank so all the fuel poured out all over my freshly painted tank ruining it almost completely. FML! so this means repainting it again :( what a fucking pain in the arse. ah well shit happens. i'll do it when i can be fucked dropping the tank again.
got the rear wheels on and was able to drop the car on the ground but it was too dark to clean out all the parts in the car and take it for a spin.

so hopefully this weekend i'll be able to finally drive the car and see how all the new gear feels, should be good. then i start on cleaning it all up again and continuing on with the paint and panel.

anyway heres some pics of todays adventure

posted image

posted image

posted image

posted image

posted image

posted image

posted image

posted image

posted image

posted image

posted image

posted image

the coilovers have plenty more adjustment to drop the car further but it still need to go through roadworthy so this height will do for now. the standard wheels look so sunken with all that camber. but i'll need that much for clearance once the hoshino's go on.

peace :)

DaGaJul 10, 2011, 12:53 am · #44

good evening bitches!

got a fuck tonne of work done 2day, my mate came round to give me a hand so i got a fair bit done.

bled the front brakes, raised the front end to make it a bit more roadworthy, adjusted the steering, adjusted the front castor, removed and panel beat both front guards, installed both front guards, bumper, filler peice, grille and the front lip so i can drive it all up to my dads factory and start to prep them for paint.

i couldn't fit the new centrelines that i just bought for 2 reasons, 1. the tyres are just far too big and 2. i didn't have the correct wheel nuts unfortunately. looking at the poke i get from a 14x7 -0 its gonna look pretty serious with a 14x7.5 -1 thats about 13mm more poke, fuckenmajesus!

got plenty of pics as well so time for a picture dump enjoy :D

looks soooooo fuckin tough out on the street, cant wait to finish the hoshino's

posted image

posted image
my mates s15 rockin ssr professors like a mexican cunt

posted image
thats about 1/10th of the dirt behind the guard BUT still no rust :)

posted image
who said it wasn't turbo, im rockin 2 snails :LOL:

posted image
this was the damaged caused by the pannel being pushed back into the door and the door being opened onto it

posted image

posted image

posted image
205's on a 7 -0 what were they thinking!

posted image
aligned like a pro

posted image

posted image

posted image

posted image

posted image

posted image

posted image

posted image

posted image

posted image

posted image

posted image
bro's lol

posted image

posted image
u were poked by davis, would u like to poke him back?

posted image

posted image
ANDRA spec (parachute and wheelie bars removed for pictures) lol

ProlowtoneJul 10, 2011, 2:35 am · #45

LOL Holly poke. are those tires.. or balloons jk jk, Car looks good, but you might need some fender flares to be road legal.

DaGaJul 10, 2011, 5:04 am · #46

haha wait till the 7.5 -1's go on the front! stretch + camber = hope they fit with minimal guarld roll lol

sam31183Jul 10, 2011, 1:10 pm · #47

i still has more poke.....

posted image


Post Merge: 01:11:36 PM / 10-Jul-11
....and

posted image
DaGaJul 11, 2011, 6:10 am · #48

lol, now thats just sillyness

DeezusJul 11, 2011, 6:19 am · #49
DaGa on 06:10:15 AM / 11-Jul-11lol, now thats just sillyness

Well normally random fags would put those on and think its cool.
Sam just does it for slicks.
DaGaJul 11, 2011, 6:59 am · #50

^^ not hating but it does look like an RC car haha

in other news just picked up some more goodies, still in keeping with period correct mods. nardi 360mm silver spoke classic and an old school boss kit, been lookin for an older style boss for ages! scored the pair for cheap, cheap

posted image

posted image