Browse › Tech ›Drivetrain

How To: Replace The Clutch

Started by Jsvob03 · Jul 6, 2004 · 14postsSMF 2010–26vBulletin 2004–05

Jsvob03date not saved · #1

We should have a How-To Section...More to come tomorrow..

So your clutch is slipping really bad, your just not working at all? Well hopefully these instructions will help.

Step 1: Gather Tools / Parts

A second set of hands (i.e. your friend)
1/2" Breaker Bar (optional)
3/8" Socket Driver
14mm Deepwell Soket
17mm Deepwell Socket
(1) 6" extension
(1) 2' or equal extension (recommended)
17mm Wrench
(2) 14mm (or 9/16) Wrenches
12mm Wrench (or socket)
10mm Wrench
Phillips Screwdriver
Flat Screwdriver
Adjustable wrench/Channel Locks (optional)
Penetrating Oil (similar to WD-40)
A light makes life easy
Note: You will need (2) wrenches corresponding to the size
of your catalytic Convertor bolts.

Now that you have gathered your tools, go ahead and get the parts you will be using..If doing the clutch unit, here is what you will need..

Clutch Disc
Pressure Plate
Throwout Bearing
Pilot Bushing
Clutch Alignment Tool
(2) convertor gaskets
(2) Y-pipe gaskets/(1) Downpipe gasket
Multipurpose Hi-Temp Grease (Bearing Grease)
3 Bottles of 80w-90 Gear oil
5' of any 7/16" O.D (5/16 I.D.) Hose (optional, But highly recommended!)

Step 2: Actually Start
Start By removing your battery from the system by disconnecting both battery cables. Use the 10mm Wrench, and disconnect the Negative side first to avoid sparks.

Step 3: Undo Interior stuff
Think about it, dropping the tranny, means the shifter is coming down. So your gonna need to disconnect it. Remove the six (6) Phillips screws that hold the center console in place. 2 are in the compartment. 2 are under the panel behind the shifter, and 2 are located on the front sides of the console. Now disconnect your shift knob. Then, carefully remove your console, and place it where you may (backseat works!) Now disconnect your shifter by cutting the two (2) retaining rings, lift out the shifter, and you could just leave the other components in (nylon bushing, spring, and 2 clips).

Step 4: Disconnect adjacent Components
This step incorporates many components related to the project you will need to disconnect, and there is no particular order.
A.) Disconnect driveshaft just behind carrier bearing. Using the two 14mm wrenches, disconnect the first shaft from the second, right behind the Carrier Bearing. (NOTE: Mark where the driveshafts come together to ensure a proper balance when reassembling) Now take down the carrier bearing by removing the two bolts on the side of it. Slowly lower it down, while guiding the shaft from the transmission.
B.) Remove Cat. Convertor., Y Pipe (v6 only)/Downpipe (4cyl). There should be four bolts/nuts holding in your convertor. Remove them with the correct tool, and set them to the side, along with the convertor. Remove your oxygen sensor. Using the 17mm Wrench, remove your oxy sensor, and place out of harms way. Now, removing the Y-Pipe/DownPipe assembly isn't required, but is highly recommended, and will save your hours (not kidding!). Using the 17mm Deepwell, and the REALLY long extension (or any method you have!), go ahead and carefully remove all of your Pipe-to-Manifold bolts. Penetrating oil is a big help.
C.) Remove Starter. Do not disconnect the wires going to your starter (unless you want to?). Using the 14mm Wrench, or socket, remove the two bolts that are on the bellhousing. Then just set the starter out of the way (it doesn't have to go more than say an inch!)

Step 5: The Fun Starts
In this step, you are going to be disconnecting the tranny, from the engine. There are 8 total bellhousing bolts (not counting the two that held the starter.) Each one needs to come out, and there is no specific rotation, or way to get them out. There are 2 small bolts, and 6 larger w/washers, note where they go. Also, there is at least one ground going from chassis to bellhousing, note it as well. Most of the bolts are easy, but there are two up top that are a fair bit harder to get. For this, grab your friend, along with the 6" extension, and that really long one (like 2'), a u-joint, and the 14mm socket. As you move the assembly closer to the bolts, have your friend guide the socket onto the bolt. Its on there..ok..TURN! This did make a nice difference for me. Remember, there are a total of 8 bolts, get them all! (NOTE: lowering the tailshaft as described in the next section may help with those two top bolts) Also, you will need to disconnect the speedo cable, and two sensors on the passenger side (right) of the tranny.

Step 6: Remove the Tranny!!
So its disconnected from the engine. Go ahead and place a Good Jack under the tranny. Make sure to place it about 70% towards the bellhousing, to ensure proper balancing. Go ahead and undo the four (4) bolts holding the Transmission crossmember to the body. (you can leave it attached to the tranny). Lower the assembly about 2" once the X-member is removed. Now is the fun part. CAREFULLY wiggle, shake, pry, and whatever is needed to get the bellhousing to actually Separate from the engine. (Careful, there is a secondary "seal" that may fall out, and that's not too fun on the head!!) Now that its separated, go ahead and move it back about 4 inches, while maintaining balance on the jack (quite fun). Once its back far enough, and you will know, Slowly lower your jack. Hey its out! Sweet! Go ahead and get it out from under the car.

Step 7: Remove Clutch Assembly.
A fairly easy step. Grab your 12mm Socket (or wrench), and the alignment tool. Place the alignment tool into the splines of the clutch disc (will help to hold the assembly when releasing it from the engine. Remove the 6 bolts holding the pressure plate to the flywheel. It's a good idea to have someone hold it in place as you do this, cause its kind of heavy. Lower the assembly out, and there you are..everythings out.

:beer: Your gonna need one!

Mr.200date not saved · #2

we do have a how to: section, it's just off the main page :finger:

but yeah, stickying this, and thanking you in advance. I'm going to be doing this soon enough, so huge help.

You ARE taking pics right? ;)

Jsvob03date not saved · #3

good call...i still have some edits to do..but im doing it as i can, cause work is taking up alot of my time...Yes, I will be taking pics How do i upload them? (not 100% with the new forum style)

Mr.200date not saved · #4

same as the old forum

host them somewhere ... I use http://www.photobucket.com

that site is a dedicated linking photo storage place and free.

then you just cut and paste the image URL from there and

paste it in between those tags

If it's a bear, PM me, and I can host the images for you and slip them into the how-to.

SHEPPO3930date not saved · #5

hey guys, nice job on the tutorial.

i just did mine a few months ago, put a Exedy H/duty on the back of my CA20E. I was jus letting you's know that i didnt remove any exhaust components and it wasnt a big deal using 2 long extensions and a uni to get the bellhousing bolts off. i thinks its quicker than removing the exhaust. I did the swap in a total of 5-6 hours by myself apart from dropping the tranny, got a mate to help there.

Just though you might like to know how i did it, catch yas

Good Doctordate not saved · #6

I will probably be tackling this come the weekend. Trying to deciede between a CF dual friction and a OEM clutch. The car is going to stay stock for the most part (reliablity and fuel milage are a must so I can afford the other toy/s) so I am not sure if the extra $50 for the CF is warranted. Plus, OEM clutches usually stand up pretty darn long on stock power levels.

I will post some pictures and reformat the thread when I am done with it.

Mr.200date not saved · #7

Dude, if you haven't already bought the clutch. I bought mine (no, still haven't installed it yet ... *lol* a dead car doesn't need 900hp worth of clutch) for like $100 cdn.

Any clutch builder can make you a super freaking HD one for cheap. They're monsters ... but I like my clutches like that.

Ron Amundsondate not saved · #8

Do you need any more photos. I need to do mine soon... really soon, perhaps this week. I can shoot some if you want.

Ron

cjaedate not saved · #9

Do you need any more photos. I need to do mine soon... really soon, perhaps this week. I can shoot some if you want.

Ron

Please do if you can! I'll be trying this for the first time sometime soon too..

Jsvob03Jul 6, 2004, 10:17 am · #10

So your clutch is slipping really bad, your just not working at all? Well hopefully these instructions will help.

Step 1: Gather Tools / Parts

A second set of hands (i.e. your friend)
1/2" Breaker Bar (optional)
3/8" Socket Driver
14mm Deepwell Soket
17mm Deepwell Socket
(1) 6" extension
(1) 2' or equal extension (recommended)
17mm Wrench
(2) 14mm (or 9/16) Wrenches
12mm Wrench (or socket)
10mm Wrench
Phillips Screwdriver
Flat Screwdriver
Adjustable wrench/Channel Locks (optional)
Penetrating Oil (similar to WD-40)
A light makes life easy
Note: You will need (2) wrenches corresponding to the size
         of your catalytic Convertor bolts.

Now that you have gathered your tools, go ahead and get the parts you will be using..If doing the clutch unit, here is what you will need..

Clutch Disc
Pressure Plate
Throwout Bearing
Pilot Bushing
Clutch Alignment Tool
(2) convertor gaskets
(2) Y-pipe gaskets/(1) Downpipe gasket
Multipurpose Hi-Temp Grease (Bearing Grease)
3 Bottles of 80w-90 Gear oil  
5' of any 7/16" O.D (5/16 I.D.) Hose (optional, But highly recommended!)

Step 2: Actually Start
Start By removing your battery from the system by disconnecting both battery cables. Use the 10mm Wrench, and disconnect the Negative side first to avoid sparks.

Step 3: Undo Interior stuff
Think about it, dropping the tranny, means the shifter is coming down. So your gonna need to disconnect it. Remove the six (6) Phillips screws that hold the center console in place. 2 are in the compartment. 2 are under the panel behind the shifter, and 2 are located on the front sides of the console. Now disconnect your shift knob. Then, carefully remove your console, and place it where you may (backseat works!) Now disconnect your shifter by cutting the two (2) retaining rings, lift out the shifter, and you could just leave the other components in (nylon bushing, spring, and 2 clips).

Step 4: Disconnect adjacent Components
This step incorporates many components related to the project you will need to disconnect, and there is no particular order.
A.) Disconnect driveshaft just behind carrier bearing. Using the two 14mm wrenches, disconnect the first shaft from the second, right behind the Carrier Bearing. (NOTE: Mark where the driveshafts come together to ensure a proper balance when reassembling) Now take down the carrier bearing by removing the two bolts on the side of it. Slowly lower it down, while guiding the shaft from the transmission.
B.) Remove Cat. Convertor., Y Pipe (v6 only)/Downpipe (4cyl). There should be four bolts/nuts holding in your convertor. Remove them with the correct tool, and set them to the side, along with the convertor. Remove your oxygen sensor. Using the 17mm Wrench, remove your oxy sensor, and place out of harms way.  Now, removing the Y-Pipe/DownPipe assembly isn't required, but is highly recommended, and will save your hours (not kidding!). Using the 17mm Deepwell, and the REALLY long extension (or any method you have!), go ahead and carefully remove all of your Pipe-to-Manifold bolts. Penetrating oil is a big help.
C.) Remove Starter. Do not disconnect the wires going to your starter (unless you want to?). Using the 14mm Wrench, or socket, remove the two bolts that are on the bellhousing. Then just set the starter out of the way (it doesn't have to go more than say an inch!)
 
Step 5: The Fun Starts
In this step, you are going to be disconnecting the tranny, from the engine. There are 8 total bellhousing bolts (not counting the two that held the starter.) Each one needs to come out, and there is no specific rotation, or way to get them out. There are 2 small bolts, and 6 larger w/washers, note where they go. Also, there is at least one ground going from chassis to bellhousing, note it as well. Most of the bolts are easy, but there are two up top that are a fair bit harder to get. For this, grab your friend, along with the 6" extension, and that really long one (like 2'), a u-joint, and the 14mm socket. As you move the assembly closer to the bolts, have your friend guide the socket onto the bolt. Its on there..ok..TURN! This did make a nice difference for me. Remember, there are a total of 8 bolts, get them all! (NOTE: lowering the tailshaft as described in the next section may help with those two top bolts) Also, you will need to disconnect the speedo cable, and two sensors on the passenger side (right) of the tranny.

Step 6: Remove the Tranny!!
So its disconnected from the engine. Go ahead and place a Good Jack under the tranny. Make sure to place it about 70% towards the bellhousing, to ensure proper balancing. Go ahead and undo the four (4) bolts holding the Transmission crossmember to the body. (you can leave it attached to the tranny). Lower the assembly about 2" once the X-member is removed. Now is the fun part. CAREFULLY wiggle, shake, pry, and whatever is needed to get the bellhousing to actually Separate from the engine. (Careful, there is a secondary "seal" that may fall out, and that's not too fun on the head!!) Now that its separated, go ahead and move it back about 4 inches, while maintaining balance on the jack (quite fun). Once its back far enough, and you will know, Slowly lower your jack. Hey its out! Sweet! Go ahead and get it out from under the car.

Step 7: Remove Clutch Assembly.
A fairly easy step. Grab your 12mm Socket (or wrench), and the alignment tool. Place the alignment tool into the splines of the clutch disc (will help to hold the assembly when releasing it from the engine. Remove the 6 bolts holding the pressure plate to the flywheel. It's a good idea to have someone hold it in place as you do this, cause its kind of heavy. Lower the assembly out, and there you are..everythings out.

:beer: Your gonna need one!

sidewaysJul 6, 2004, 11:51 am · #11

best tip i have for dropping the transmission is use a bungee cord around the tailshaft and hook it in the hole in the floorboard.  this will help move the transmission around a bit.  also make sure you use 4 jackstands and keep the car level.  this helps alot with putting the tranny back on more than anything.

YokohamaSep 23, 2010, 12:50 pm · #12

The easy way to do it without a shop lift is the remove the engine and transmission as a unit and do everything outside the car.

TobbethedudeNov 13, 2011, 12:57 pm · #13
Jsvob03 on 10:17:16 AM / 06-Jul-04*****

So your clutch is slipping really bad, your just not working at all? Well hopefully these instructions will help.

Step 1: Gather Tools / Parts

A second set of hands (i.e. your friend)
1/2" Breaker Bar (optional)
3/8" Socket Driver
14mm Deepwell Soket
17mm Deepwell Socket
(1) 6" extension
(1) 2' or equal extension (recommended)
17mm Wrench
(2) 14mm (or 9/16) Wrenches
12mm Wrench (or socket)
10mm Wrench
Phillips Screwdriver
Flat Screwdriver
Adjustable wrench/Channel Locks (optional)
Penetrating Oil (similar to WD-40)
A light makes life easy
Note: You will need (2) wrenches corresponding to the size
          of your catalytic Convertor bolts.

Now that you have gathered your tools, go ahead and get the parts you will be using..If doing the clutch unit, here is what you will need..

Clutch Disc
Pressure Plate
Throwout Bearing
Pilot Bushing
Clutch Alignment Tool
(2) convertor gaskets
(2) Y-pipe gaskets/(1) Downpipe gasket
Multipurpose Hi-Temp Grease (Bearing Grease)
3 Bottles of 80w-90 Gear oil 
5' of any 7/16" O.D (5/16 I.D.) Hose (optional, But highly recommended!)

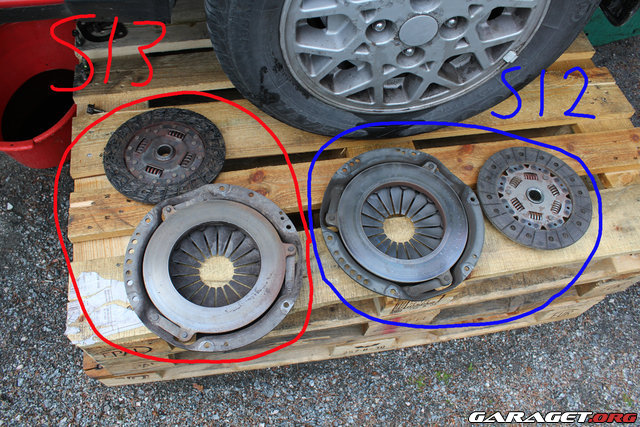
NOTE s13 CA18DET clutch works fine and fit bolt-on
posted image

Step 2: Actually Start
Start By removing your battery from the system by disconnecting both battery cables. Use the 10mm Wrench, and disconnect the Negative side first to avoid sparks.

Step 3: Undo Interior stuff

Pic1
posted image
Pic2
posted image
Pic3
posted image
Pic4
posted image
Pic5
posted image

Think about it, dropping the tranny, means the shifter is coming down. So your gonna need to disconnect it.
Objects marked purple can be removed by bending carefully! (we are not responsible for any damage)
Remove the six (6) Phillips screws that hold the center console in place. 2 are in the compartment (Pic1). 2 are under the panel behind the shifter((pic2), and 2 are located on the front sides of the console (pic3). Now disconnect your shift knob (counter-clockwise). Then, carefully remove your console, and place it where you may (backseat works!) remove the 4 Pillips screws holding the dustseal (pic4) Now disconnect your shifter by cutting the two (2) retaining rings(pic5), remove the locking ring(pic5 right corner), lift out the shifter, and you could just leave the other components in (nylon bushing, spring, and 2 clips).

Step 4: Disconnect adjacent Components

Pic1
posted image

This step incorporates many components related to the project you will need to disconnect, and there is no particular order.
A.) Disconnect driveshaft just behind carrier bearing. Using the two 14mm wrenches, disconnect the first shaft from the second, right behind the Carrier Bearing. (NOTE: Mark where the driveshafts come together to ensure a proper balance when reassembling) Now take down the carrier bearing by removing the two bolts on the side of it(pic1 green). Slowly lower it down, while guiding the shaft from the transmission.
B.) Remove Cat. Convertor., Y Pipe (v6 only)/Downpipe (4cyl). There should be four bolts/nuts holding in your convertor. Remove them with the correct tool, and set them to the side, along with the convertor. Remove your oxygen sensor. Using the 17mm Wrench, remove your oxy sensor, and place out of harms way.  Now, removing the Y-Pipe/DownPipe assembly isn't required, but is highly recommended, and will save your hours (not kidding!). Using the 17mm Deepwell, and the REALLY long extension (or any method you have!), go ahead and carefully remove all of your Pipe-to-Manifold bolts. Penetrating oil is a big help.
C.) Remove Starter. Do not disconnect the wires going to your starter (unless you want to?). Using the 14mm Wrench, or socket, remove the two bolts that are on the bellhousing. Then just set the starter out of the way (it doesn't have to go more than say an inch!)
 
Step 5: The Fun Starts

posted image

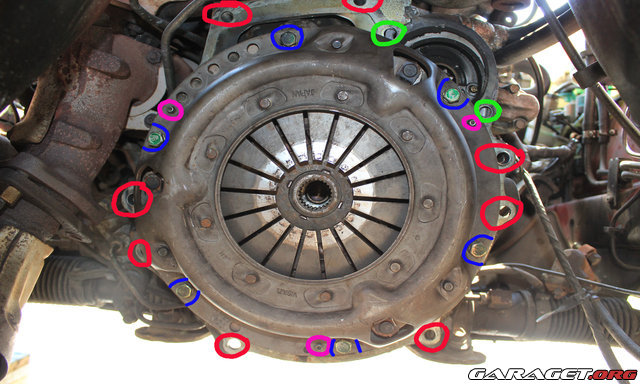
In this step, you are going to be disconnecting the tranny, from the engine. There are 8 total bellhousing bolts (marked red) (not counting the two that held the starter (green).) Each one needs to come out, and there is no specific rotation, or way to get them out. There are 2 small bolts, and 6 larger w/washers, note where they go. Also, there is at least one ground going from chassis to bellhousing, note it as well. Most of the bolts are easy, but there are two up top that are a fair bit harder to get. For this, grab your friend, along with the 6" extension, and that really long one (like 2'), a u-joint, and the 14mm socket. As you move the assembly closer to the bolts, have your friend guide the socket onto the bolt. Its on there..ok..TURN! This did make a nice difference for me. Remember, there are a total of 8 bolts, get them all! (NOTE: lowering the tailshaft as described in the next section may help with those two top bolts) Also, you will need to disconnect the speedo cable, and two sensors on the passenger side (right) of the tranny.

Step 6: Remove the Tranny!!

So its disconnected from the engine. Go ahead and place a Good Jack under the tranny. Make sure to place it about 70% towards the bellhousing, to ensure proper balancing. Go ahead and undo the four (4) bolts holding the Transmission crossmember to the body. (you can leave it attached to the tranny). Lower the assembly about 2" once the X-member is removed. Now is the fun part. CAREFULLY wiggle, shake, pry, and whatever is needed to get the bellhousing to actually Separate from the engine. (Careful, there is a secondary "seal" that may fall out, and that's not too fun on the head!!) Now that its separated, go ahead and move it back about 4 inches, while maintaining balance on the jack (quite fun). Once its back far enough, and you will know, Slowly lower your jack. Hey its out! Sweet! Go ahead and get it out from under the car.

Step 7: Remove Clutch Assembly.
A fairly easy step. Grab your 12mm Socket (or wrench), and the alignment tool. Place the alignment tool into the splines of the clutch disc (will help to hold the assembly when releasing it from the engine. Remove the 6 bolts holding the pressure plate to the flywheel. It's a good idea to have someone hold it in place as you do this, cause its kind of heavy. Lower the assembly out, and there you are..everythings out.

:beer: Your gonna need one!
Jsvob03 on 10:17:16 AM / 06-Jul-04*****

Pictures whas added to the text by Tobbethedude, any questions about the images is send to him!
Any questions regarding the text should be sent to Jsvob03 


Cheers!
Teng187Jan 4, 2013, 11:49 am · #14

Hello Jsvob03 ,

I have to replace my clutch.

You say that the clutch from the s13 and the s12 are the same right ?

Does it make any difference if you have a CA engine or a FJ engine ??

Because i have a s12 from '85 with a FJ20E and i can buy a complete standard s13 clutch kit for a nice price...but i wan't to be a 100% sure that it fitts.

Regards,

Ricardo