Browse › Tech ›Visual mods and audio

Homemade Gauge Pod

Started by Deezus · Aug 17, 2010 · 14postsInvision 2005–09

DeezusAug 17, 2010, 10:39 pm · #1

(some pics to come in a few minutes.)

I decided to write this AFTER i had already finished it... soo no progress pics but its VERY simple.

Tools/Supplies

OEM Clock
Whatever tools to remove it (mine was already taken out so idk)
Cutting tool, (band saw would probably be best)
Bondo/Hardener
Piece of glass to prep bondo with
High Temp Furnace tape (you can get it at lowes/hardware stores, its chrome)
Primer/Paint
Drill/Drill Press and bits the size of your gauges, and maybe 1 a little bigger
Sand paper

1. First you want to remove your oem clock. I dont know how this is done because mine was already removed when i bought my heap. You need to use this, so dont break it.

2. You want to take your clock and go to your bandsaw (or whatever youre using) and cut the faceplate off. The plastic peice you see, you want to keep that, so cut that off.

3. Now that you have the piece cut off, throw away your old clock. You didnt need it anyway, who needs to know the time?

Take your bit that is the same size at your gauges or a little bigger, and drill 1-3 holes in the faceplate. These holes are just the clear the inside of the faceplate out so your guages fit inside it. It all depends on how you want yours set up, I used 2 and a bit bigger than my guages because ill be getting new ones eventually that will be bigger.

4. Now that you have you faceplate with holes in it. Get youre furnace tape (this shit smells funny and its really sticky) Use the tape to cover the front of the faceplate. Do not let it go around the edges, only on the front. So now you have pretty much a blank/flat faceplate that will fit into your dash.

5. Take your bondo and mix it (make sure you touch your weiner and eyes before this step)Then lay it over the front, its alright for it to touch the sides because it will be sanded off. Slop some on the inside too so it will stengthen it.

6. Let it dry, then sand and rebondo until its smooth. Prime it a couple times and it will make any imperfections stand out.

7. After you have it all sanded and smooth. Get your bit and drill however many holes you need to fit you gauges. Im a retard and mine arent center. so make sure yours are.

This is what it looks like from the back. Look at how i drilled the hole in the faceplate, and then again in the bondo to fit my guages. I used painters tape and electrical tape so the can squeeze in.
(IMG:http://i281.photobucket.com/albums/kk206/jimbobnorton/08ca6863.jpg)

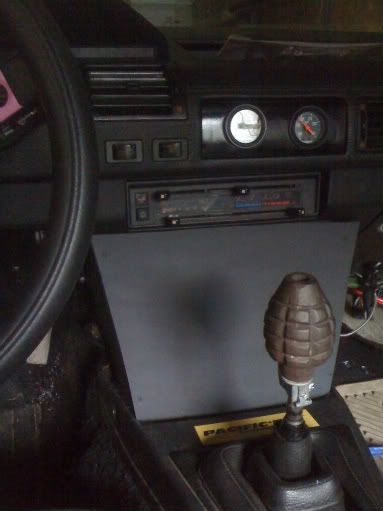
Heres what it looks like all done.
(IMG:http://i281.photobucket.com/albums/kk206/jimbobnorton/fd09b68f.jpg)
(IMG:http://i281.photobucket.com/albums/kk206/jimbobnorton/c0b03fe2.jpg)

This post has been edited by Deezus: Aug 17 2010, 11:09 PM

Navy_Mech2Aug 18, 2010, 12:06 am · #2

Sweet! Looks like there was room for a 3rd gauge even.

BTW, that pineapple shifter knob is epic!

DeezusAug 18, 2010, 12:07 am · #3

thanks dood. Yea its super easy to make as long as you have the clock. there is plenty of room for a 3rd gauge or just 2 bigger.

This post has been edited by Deezus: Aug 18 2010, 12:09 AM

xxstreetbikesxxAug 18, 2010, 1:00 am · #4
Navy_Mech2 @ Aug 18 2010, 12:06 AM
Sweet! Looks like there was room for a 3rd gauge even.

BTW, that pineapple shifter knob is epic!


LOLOLOL (IMG:style_emoticons/default/rofl.gif) Pineapple knob? lol its a granade!

Anyway, thanks alot for making this write up.. Im definetly doing this as soon as i get some time..
DeezusAug 18, 2010, 1:13 am · #5

lmao no problem, youre the first person to ask about it so i figured id write it up. Its really simple if you know how to use basic tools.

EDIT: oh yea... its called a pineapple grenade lmao

This post has been edited by Deezus: Aug 18 2010, 01:14 AM

Navy_Mech2Aug 18, 2010, 1:50 am · #6
xxstreetbikesxx @ Aug 17 2010, 09:00 PM
LOLOLOL (IMG:style_emoticons/default/rofl.gif) Pineapple knob? lol its a granade!

(IMG:style_emoticons/default/chair.gif)
MaxpowAug 18, 2010, 4:23 am · #7

Looks sick.

taktics702Aug 18, 2010, 11:07 am · #8

looks nice,great job!
a little off topic sorry.
' after removing the clock, about how deep of space on the inside do you get and is there any metal or study structure in place? I am planning to do the same thing but mount a screen, and was just wondering if there was anything sturdy enough to mount a bracket to hold a screen securely.

xxstreetbikesxxAug 18, 2010, 12:31 pm · #9

lol. i thought u meant a pineapple, like the food lol. I know its a pineapple granade (IMG:style_emoticons/default/lol.gif)

Anyway, i need to my my safc in there, not gauges..

DeezusAug 18, 2010, 3:39 pm · #10
taktics702 @ Aug 18 2010, 07:07 AM
looks nice,great job!
a little off topic sorry.
' after removing the clock, about how deep of space on the inside do you get and is there any metal or study structure in place? I am planning to do the same thing but mount a screen, and was just wondering if there was anything sturdy enough to mount a bracket to hold a screen securely.


I'm not 100% sure on what your asking, but ill try to answer it anyway (IMG:style_emoticons/default/smile.gif)

The plastic is a pretty hard material, so im sure you would be able to mount the screen. And idk how the clock mounted in the dash because like i said, my clock was already out when i bought my car. And my pod doesnt screw in, it just presses in which feels solid enough because i have to use a screw driver to pop it out.

And behind the clock theres probably... im just going off memory but anywhere from 4-6inches. And theres some wires back there.
KeithAug 18, 2010, 4:33 pm · #11

or just get a piece of black plexi-glass, cut to fit clock opening, cut holes for gauges, then add angle rings and gauges....and wedge in hole! I've had mine this way for 5 years or so.

(IMG:http://carphotos.cardomain.com/ride_images/1/2704/921/6757960027_large.jpg)

falkhenAug 18, 2010, 4:54 pm · #12

kieth that is a worthless picture...
I can't see the front of the guages...

KustamogenAug 18, 2010, 5:02 pm · #13

wedging shit in holes is one of my fave thing to do!

KeithAug 18, 2010, 5:07 pm · #14
falkhen @ Aug 18 2010, 04:54 PM
kieth that is a worthless picture...
I can't see the front of the guages...

why do the front of the gauges need to be seen? They're gauges! The purpose of the pic angle is to show the face plate with angle rings....but for you here is a pic of the gauge faces....

Note these gauges have been replaced with AEM's Tru Boost and Uego wide band controller

(IMG:http://carphotos.cardomain.com/ride_images/1/2704/921/6757960030_large.jpg)

This post has been edited by Keith: Aug 18 2010, 05:08 PM