!!! ROLL UP YOUR WINDOWS BEFORE BEGINNING !!!
TOOLS NEEDED
10mm Wrench
10mm Socket
Ratchet + Extension or 1/4, 1/2 Screw driver wrench.
Phillips Head Screw Driver
Needle Nose Pliers
(Flat Head optional)
--------
TIME: 20 MIN PER DOOR
---------------
---------------------------
---------------------------
Our cars are old, these plastic pieces are brittle now and quite delicate, if you dont want cracked interior use the bare minimum force required to free up the plastic stuff.
1. Press up with your thumb from the bottom to free the bottom tab. Pull out a bit, then pull down.
2. Start with one of the bottom corners, pull down and out lightly, once you get one tab out slide your finger underneath the plastic and work your way around the edges until it pops out.
3. Break out the phillips head. Pinch the underside and the armrest side and pull toward you, it should pop right out. Unscrew and place screws in a tray of some sort.
4. On the passenger side "Oh Shit" bar, push the covers down a bit, then away from the bar. Unscrew and set them in a tray.
-----------
Now that the fasteners are off. Reach down to the bottom corner closest to the hinge, pull lightly until you hear a snap. (Its supposed to make that noise.) Keeping your hand under the panel, work your way up unsnapping the fasteners as you go. Now skim along the bottom doing the same.
The closer you can get to the fasteners the cleaner they break free.
If you just grab the corner and yank, they WILL break off. If you want to be real precise and not break any, there is a tool for this, it looks like a big flat head with an angled head, and there is a slot cut down the middle. Optionally you can use a flat head screwdriver, but it up against the fastener and very lightly pry. If you use a screw driver, make sure your pivot point is 3 inches or so past the fastener.
Now that all of the snap in fasteners are off and un-broken. You are asking your self why the hell this thing will no come off.....
Lift straight up on the entire panel, be careful with the lock button it can snag and break easily. Start furthest from the defroster, gently pull it out of the groove while checking that its not snagging, if its caught on the handle, Wiggle it while pulling. If you bend the tab that slides in the groove it will be difficult to put back in.
--------------------------
--------------------------
To make things easier, remove the window guide mounting bolt (Bottom bolt in the picture), to make things a little more flexible.
Start removing the handle by LOOSENING the two 10mm nuts, do not remove them just yet.
Place flathead as shown, pinch it with your thumb, and pull. Place in tray.
Now you can get to the first nut to loosen.
Grab your 10mm wrench, and move to the nut on the inside.
Now that you have some play in the handle assembly, remove the the lock bar and latch bar from their brackets.
Hold the bar with one hand, with the free hand use the flat head to pry gently on the plastic holder shown. It will rotate out of the way once you unsnap the bar. Place your thumb on the bracket and while holding the bar press down on the bracket, this is to prevent bending the bar.
Move on to the latch bar.
Pull the door handle up to push the latch bracket down. While pulling the handle up reach in with your free hand and hold it in place, Now let go of the handle. The latch bar will rise. Loosen the slack adjustment so that you have as much clearance from the latch bar as possible. Now that its loosened, pull the bar up and the bracket down. They should now be free.
Now remove the nuts... lol
This little bugger is the biggest pain when swapping the locks. With the lock cylinder still in place it is very difficult to maneuver out of the hole.
Pull the handle assembly as far out as you can without forcing it.
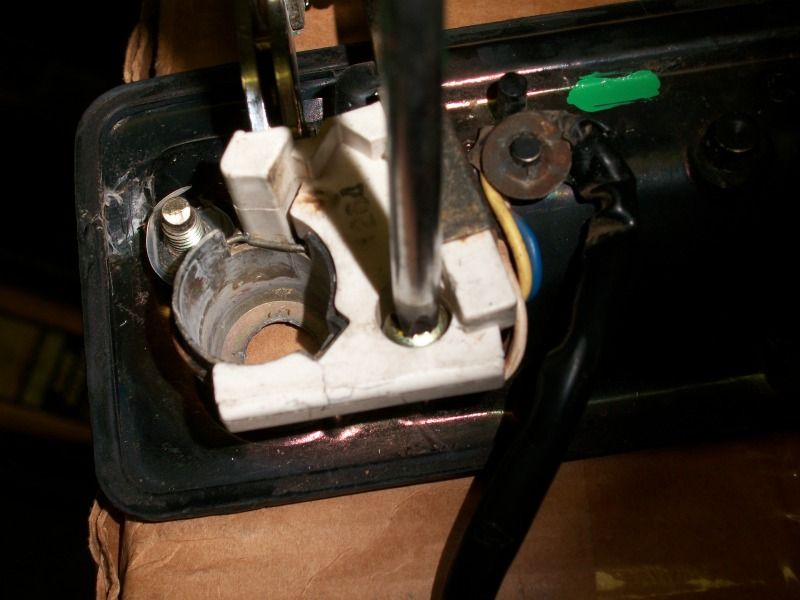
Now that you have room, Gently, Pull on the lock-spring shown in the above picture until its out of its groove. Pull the cylinder out, now you can maneuver the handle assembly out of it hole.
Now that its out, reposition the lock-spring as shown.
Replace the handle, be careful not to knock the lock spring into the groove, it will make things a pain in the ass later, and angle it as shown, it will make replacing the cylinder much easier. You cannot assemble the lock cylinder with the handle assembly and insert it as a whole without bending/breaking anything.
While nothing is in the way, reach in with one hand and grab the latch bar, with the other hand pull down on the bracket. Leave it floppin around in there for now.
Position the lock cylinders key to match the groove in the handle assembly, once that its sitting in the groove let it rest against the window guide. It shouldnt fall out. Carefully move the handle assembly back into its mounting slots, keep an eye on the lock cylinder.
Replace the 10mm bolt through the access hole, but do not tighten, just enough to keep the nut on.
Push on the lock cylinder through the access hole, while holding it as far as it will go. Look on the front of the handle assembly to make sure its all the way in. If it is not in, then your lock-spring fell into the groove. If its in all the way. Hold it, and with your free hand use the needle nose pliers to pull the lock-spring into its groove, make sure that the flat of the spring is in the groove, if any other part is in the groove, the cylinder may pop out with the first key use.
Replace the lock bar back into its bracket just like you took it out.
Replace the other 10mm bolt, tighten each in increments to prevent a gab between the handle assembly and the door.
Now your lock and latch are functional.
Test it with your key!
----------------------------
---------------------------
Replace the door panel as you removed it.
For the snap in fasteners use your palm and one at a time line them up and smack em' into place.
Jan 1, 2008, 7:04 pm · #1